Nightmare on Elm St.

The journey of turning the nightmare we bought on Elm St. into our dream home...

My blog has moved! Redirecting...

You should be automatically redirected. If not, visit www.nightmareonelmst.net and update your bookmarks.

Monday, January 30, 2006

Blood, Bricks, and Borers, Oh My!

I know it's been awhile, but I promise to make up for my laziness in posting with good stories. So, the last time I posted, we were planning to finish (ha!) the framing and the shower in the bathroom was scheduled for a tearout.

On Saturday the 21st, I drove down to Rockville to meet a good friend for lunch, and left Aaron and his home-improvement partner in crime, Mike, to the demolition. I left before Mike arrived, so I didn't get to approve or disapprove his choice of work clothes for the demo of ceramic covered cinderblock. I imagine that you can all see where this is going. Mike chose to wear admittedly long basketball style shorts (the weather has been strangely warm this winter) and admittedly tall socks, but there was still quite a gap between the top of his socks and the bottom of his shorts of exposed, bare, leg. (But, I don't care how many times that they argue that that configuration is "like pants". It's not!) I knew from what Kristin at 1902 Victorian had posted about tile demo that it could be hazardous because the broken tile edges are really sharp. But, Mike and Aaron didn't think about that. Soooo, I have a nice relaxing lunch with my friend, and I call home on my way back to learn that they need all sorts of medical supplies because a shard of brick sort of lodged itself in Mike's leg, bleeding profusely (Mike was quoted as saying "Hey man, why are these bricks all red?") and probably requiring stitches. (Mike of course, wouldn't stop working to (a) partake of the medical supplies I went out to pick up for him or (b) to walk the 20 feet to the hospital at the end of our street for real medical attention. He had to make it to the dump before they closed.) I am very grateful for Mike's sacrifice, but I prefer everyone to leave with no injuries! Moral of the story- be careful when doing demo!

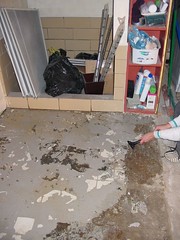
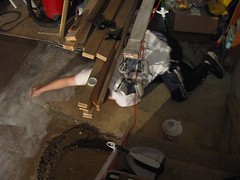
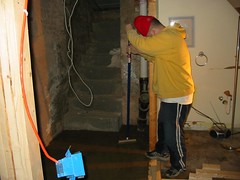
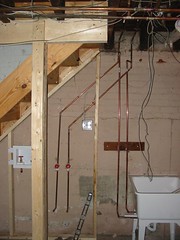
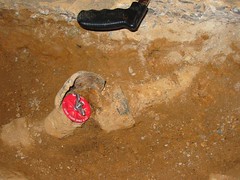
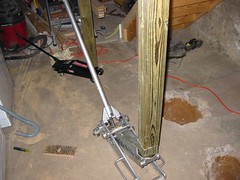
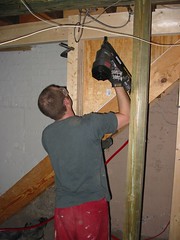
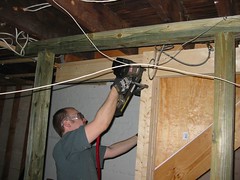
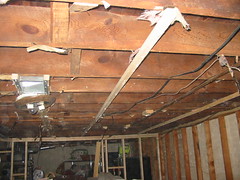
All of this blood and guts uncovered (finally) unpainted brick walls, but they need a lot of work in the tuckpointing department- no problem, thanks to our wonderful neighbors assistance, we feel pretty comfortable with that now. Also, there is something very odd going on with two beams shown in the picture below. They are very crooked coming out of the wall, but then become gradually straighter as they go toward the center of the room, and are more or less straight after about 3 or 4 feet. Is this intentional? Is this something that we need to fix? The more that we look at it, the more puzzled that we become. Here are three pictures of the area-


badcorner1


badcorner2


badcorner3


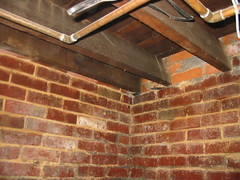
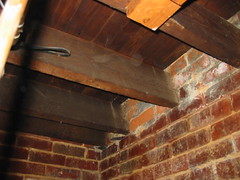
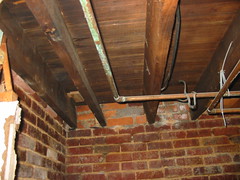
Any comments/suggestions are greatly appreciated.

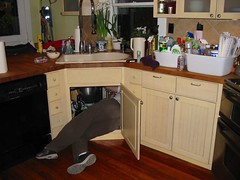
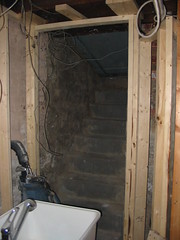
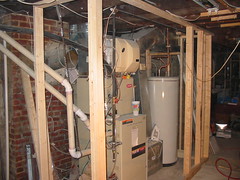
Aaron and I did a little more framing on the 22nd, but had a lot of issues going around the back doorway, so we spent a lot of time and effort with not a lot of results. Going around that sewer pipe in the corner (with an angled wall to preserve as much space as possible) was not fun.


more framing


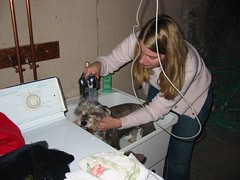
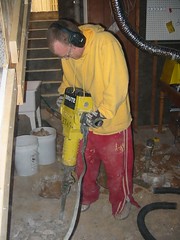
Aaron and I had a lot going on at work last week, so our plans to rip insulation down in preparation for the extermination of what our company called "wood borers" but I actually believe to be "powder post beetles" didn't happen until Wednesday night, at about 9:00 pm b/c Aaron had a dinner for work, and the Beltway was closed due to a big accident, so I had to take the Metro to school, which triples my commute time, b/c I have to go all the way into the city on one line, change lines and go all the way back out. Blech. Fortunately, we were able to rip it out really quickly (we had something like 20 trash bags stuffed full of insulation for the trashmen- I felt like we were throwing away money, but there was no way to put it back up, it got too destroyed, plus I was paranoid that the bugs were in it, too, which is probably crazy, but whatever.) The exterminator soaked everything really well, so hopefully they won't be back. We'll have three more treatments just to be sure.

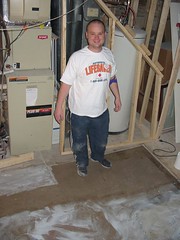
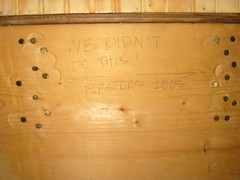
Here is our poor ceiling with no insulation- we still have some tufts and furring strips to get down. However, the 1st floor is warmer now, so maybe ripping it down was a good thing.


ceiling


This past Saturday was sunny and warm, so we took advantage of the good weather and went on a little antiquing mission downtown. We almost never take advantage of our fabulous location and walk downtown just for fun, but we needed to buy some bread, I wanted to try a new place for lunch, so downtown we went. After we ate, I was hoping to hit it big (ahem! doorknobs! ahem!) at our favorite architectural/salvage place. But they were closed! At 1:00 on a warm Saturday afternoon! I was disappointed, but we had a good time anyway at some of the other stores.

Sunday was rainy and windy, so we got back to work. We framed a few transition areas we'd skipped the previous weekend, and worked on the frame for the long, long doorway for the utility closet. Framing in an existing home is challenging b/c nothing is the same, and you have to work around so much existing stuff. We put in 2 hours on this doorway and then finally thought that we had it level, plumb, and square, only to find that the freon pipe for the A/C had pushed us an inch out from where we wanted to be. We don't feel comfortable moving the pipe (we will move the PVC pipes for the exhaust ourselves) so we're having them come to take a look at it on Friday. Hopefully they will be able to take care of it then, b/c it's holding us up.


doorway


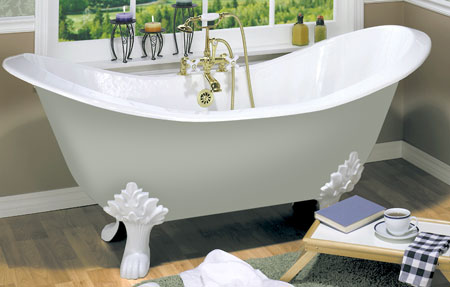
In other news, Aaron was hit with a big brainstorm for the bathroom. As I alluded to in the first paragraph, we were disappointed to find that all of the brick walls in the basement had been painted, and would require a lot of work to expose. Seeing the pretty brick walls in the bathroom made me realize how nice this would have looked had it worked out, especially since we have to repoint the entire area. So, the plan is now to put wainscoting up to the brick line, and then expose the bricks on the back wall and the side wall (the other two walls will be wainscoting and drywall). In order to hide the water supply lines, we'll probably have to change to a single slipper tub, not a double slipper like we had originally wanted, but that allows us to keep the sink in it's original location, which made more sense, and eliminates the issue of dealing with the clearance around the tub. I'm excited about the new plan (especially since the tub will be cheaper) and I think that it will look great.

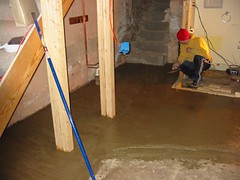
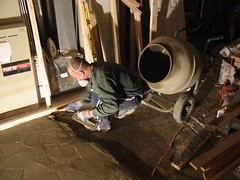
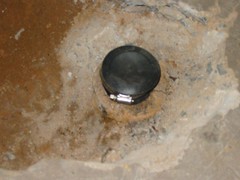
Aaron and I are taking Friday off to do more concrete work. Blech. We're relocating the drain in the bathroom for the new tub, and pouring a thicker slab under the tub to better support the increased weight in that area.

If we get to it this week, we'll publish a good post on tuckpointing with pictures! Stay tuned...

Wednesday, January 18, 2006

Mission Accomplished!

Days of hard, dirty, dusty work... 4
Trips to haul concrete in my poor SUV... 5
Number of 80lb bags concrete poured...37 (that's 2960 lbs!, Thanks Mixmaster Mike!)
One level concrete basement floor... PRICELESS!!!

We're thrilled to be done. We're not thrilled that since we have decided to install one of these...


(possibly with chrome feet, not sure of that yet)

which has tremendously more aesthetic appeal that the scary shower you see in this picture...


0117linoleum

But will require us to take a day off work, rent a jackhammer, dig out the drain for the shower, and relocate it to the place where we will need it to accomodate the tub. Then, Mixmaster Mike or one of his cousins will come back so that we can pour a new floor for the bathroom. My dad suggested that it's best that we do this anyway, as our basement floor is only about 2-3" of concrete over the original dirt floor, and he thought at least 4" was necessary to support the bathtub plus the water.

We will be able to enlarge the bathroom to a space that is 4'10" wide and 10' long. The tub will go against one wall, turned longways to maximize the space in the long, narrow room. The tub is 31" wide, which will leave a clearance of 27". We're not sure if that is quite enough, it may end up being a little tight walking by the bathtub. Any comments?

In other news, we purchased a termite warranty when we bought the house, since we had wood boring beetles in a floor joist when we moved in, which were treated. This warranty requires yearly inspections. Since we had the ceiling out in the basement, we went ahead and scheduled the inspection. They were able to get a really good look at all of the joists, and found some more in an area that they had not previously treated. Apparently these little guys are pretty hard to get rid of! They haven't done any structural damage, fortunately, (they're not nearly as destructive as termites) but it's important to take care of them as soon as possible, because it will require several treatments to completely irradicate them. We expect to have treatments every 3-4 months for the next year or so. This means that we need access to the ceiling for at least the next year, and would like to be able to get back in there to do the inspections beyond that. SOOO, we've decided to use the American Tin Ceilings panels that we had been considering, but instead of going with the nailup option that we had originally chosen, we're going to put in a dreaded (by many of you out there!) drop ceiling grid, and use their drop-in tin panels. We will paint the grid to match the tiles, and hopefully (if the pics in their brochure and on their website are any indication) it will look nice, and be easily removed. I ordered a color sample kit from them of the "whites". (We have the unfinished tin in our kitchen, and love it, but due to the low ceiling in the basement, we think that white is the best choice.)

Here is a picture of the color sample kit. We've chosen the second one from the left in the bottom row: "bright white satin".


ceiling color choices


Now we're trying to decide on a pattern. We're using recessed lighting, and some of the pictures show a cutout in the circle motif for the lights, which I thought looked nice. That narrowed our choices down to the following two-

choice 1


or

choice 2


If you have any opinion, please vote in the comments section below. Remember, they will both be matte white on our ceiling, and the ceiling is low, in a long, relatively narrow room.

Thanks for your vote!

Tuesday, January 17, 2006

Get a snack and a soda people, it's a long one...

Well, I promised last night to post a longer entry today, and I'm a woman of my word! As I've mentioned before, the objective of the weekend was to level the basement floor. Thanks to homeimprovementninja, 1922 Colonial ,and Frederick Brick Works we had some good advice as to how to proceed. We had originally planned to use self-leveling floor cement, but we had too big of a drop off (1.25") and it's $30/bag, as opposed to Sakrete, which is $4/bag. So, we picked up a gallon of Leplex (latex concrete bonder), and 16- 80lb bags of Sakrete. The guy at Frederick Brick Works suggested that we use the angle grinder to cut a line in the concrete to the point that we're trying to level, so that we could push the concrete to that, instead of trying to feather it out,which was pretty much guaranteed not to work. By the time we picked up everything and dropped it off, including the rented concrete mixer, it was pretty late in the day, and Aaron had broken his glasses, so we spent the rest of the evening dealing with that and watching football with friends. Sunday morning, we were up bright and early and ready to get started. We cut the line in the concrete, and chiseled it out at an angle to give us more room to get the concrete in. Then we removed the toilet and vanity from the bathroom so that we could take care of that area as well, which first required removing the linoleum. Unfortunately, the toilet had been leaking (which we did not know) for a long time, and there was a lovely mildew or mold layer underneath the linoleum. I also don't know what they put this linoleum down with, but it didn't want to come off. We hit it with the heat gun, water, etc. all to no result. Finally, we got the plastic upper layer off, then soaked the papery bottom layer with a strong bleach solution and were able to scrape it off with floor scrapers. Nasty! Then, we were finally ready to get started with the concrete. By this point, it was pretty late, so we painted Leplex on half the floor and called it a day. We had Monday off, so we got up early and started mixing and pouring the concrete. We poured almost all of the bags, painted the rest of the Leplex and then we had a blood donation appointment at the Red Cross, so we took a break for that and for lunch, then came back and mixed and poured the rest of the concrete we had plus the other 6 bags that we had bought! This is why I was so tired last night. Tonight, we poured another 8 bags of concrete. We estimate that tomorrow night will require 8 more bags, and then we should finally be finished with a nice level floor and a rough, ready for tile surface.
And, for the pictures...

The line that we so carefully made in the concrete, and didn't actually use-

0117concrete

The nasty linoleum floor that was so difficult to remove-

0117linoleum

Leplex action shot. This stuff is smelly and the consistency of Elmer's Glue

0117paint

Aaron's a trooper! 1 pint down and he's still mixing cement!

0117lifesaver

Aaron smoothing the last area of the concrete that we did on Monday. I should have taken more before shots, but the floor sloped obviously to the left side of the picture.

0117aaronconcrete

Brooming the area by the door... this will hopefully give the thinset for the tile more area to stick to

0117broommasteraaron

Tonight, we decided to move the mixer (I like to call him Mixmaster Mike) down to the basement so that we could speed up the whole process, and also not freeze to death. This was a great idea, and made the whole process go much more quickly and easily, since we could just dump the concrete on the floor, instead of into two buckets, which we then had to carry downstairs. We will definitely finish this way. Here's Aaron finishing up the area that we did tonight. I promise that I do work, I just also take pictures!

0117mixmastermike

Stay tuned for tomorrow night, when hopefully I can report that we're finished!

Monday, January 16, 2006

Update from the edge of exhaustion

Top ten things I learned this weekend:
1. Latex concrete bonder looks and feels like Elmer's glue and smells much worse
2. Mildew can live under your linoleum
3. Mildew that decides to live under your linoleum may act like a bioadhesive, requiring several hours and some special tools to remove, and a lot of bleach to kill
4. You always need more concrete mix than you've calculated
5. A level floor takes more than 3 days to achieve
6. 22 bags of concrete is a lot, but still not enough
7. The termite warranty inspector shows up very early in the morning and bangs a lot
8. Wood boring insects are difficult to kill (at least they aren't termites)
9. Concrete work makes you very tired
10. We're still not done leveling the floor and I'm exhausted, so I'm not doing a real post tonight

Monday, January 09, 2006

So fresh and so clean...

Well, this picture summarizes our weekend pretty well (it's the valve that gave us so much trouble and was eventually replaced, surrounded by SOME, but not ALL of the subsequent receipts for our trips to the big orange and blue boxes):

wknd summary

Aaron says that the compression fitting that is on the elbow is the one that was causing all of the problems. As the fitting was designed for a straight piece of pipe and not an elbow, when Aaron loosened it and retightened it, it started leaking. Oh well, it's been replaced by two separate valves now.

I decided to make excellent use of all his hard work and give our little schnauzer a much needed bath tonight. I haven't had a laundry sink with a faucet since I left my parents house, so this was a nice treat for me, if not for Ansley:

new sink

not happy


The amount of anger that she can express without even using her eyes is amazing!

all done


Aw! All clean and very cute (I can't believe I got her to pose for me for once!) We keep her cut like a schnauzer in the summer, but in the winter she gets really cold and we let her coat grow out, that's why she looks a little shaggy.

I am also thrilled because we've been able to do laundry again! So everything around here is much fresher and cleaner!

Pipe Dreams II- The reality

Well, Aaron never got the valve under the sink to completely stop leaking on Saturday night. It had something to do with the POs dubious use of a compression fitting on an elbow (I took a picture, but haven't had time to upload it). He put a bucket under the leak and we both showered, etc. then he turned the water back off again. He pulled everything back apart on Sunday and resoldered it, after that, no more leaks there. We had two more leaks in the laundry area, but got everything plumbed up by 2 pm on Sunday. Aaron said "Well, I probably sweated something like 50 joints, and only 5 of them leaked. Considering my experience level, that's pretty damn good." I have to agree, even though it meant that Aaron's birthday totally sucked. Stay tuned for a few exciting developments this week, including "How crooked is that basement floor?", "Shiny, Happy Toilet" and "FINALLY! We've sealed the deal with a ceiling decision!"

Saturday, January 07, 2006

Pipe dreams

A few days ago, I mentioned that Aaron was moving some pipes in the basement and redoing some connections for the washer. Well, this project has turned into a much bigger job than we expected. (You would think, that after all this time, we would have figured out that nothing is ever simple, and anything that can go wrong, will go wrong and require at least 3 more trips to HD or Lowes! You'd also be wrong.) Anyway, we're at 28 hrs and counting with the water turned off, we've fixed 3 leaks and are working on the 4th, and hope to shower tonight. And, I might also mention that today is Aaron's birthday. Poor guy has spent the entire day in the basement, sweating joints and getting burned by hot solder. We were going to go out to dinner, but that's before the weird double valve (that neither HD in town carries) under the kitchen sink started leaking (we didn't even do that one-- it was already here!). We are celebrating with pizza, beer, 22 man hours in the basement (I say man hours b/c my role in this project has been limited, I undecorated and cleaned today) and 4 trips to Home Depot instead.

Here is the birthday boy under the sink (at least he isn't in classic plumber's position):

plumber


And here is some of his amazing handiwork. There were no pipes here yesterday:


newpipes


Here's to hoping that a little birthday magic (or some fairies, I hear that they've been working hard all over the place lately) will get this leak stopped before the pizza shows up!

Thursday, January 05, 2006

Got milk?

We live in an interesting little town. One of the more interesting features of Frederick is its large community of organic farmers, where you can get not only fresh veggies, but milk, eggs, meat, poultry, bread, etc. etc. However, in the winter, there is no Farmer's Market, and we have trouble getting to the market even when it's open because we're always working on the HOUSE! I had known for a long time that South Mountain Creamery, the source of yummy organic dairy products, had home delivery available. I also noticed that since we stopped buying the yummy fresh milk, that I had almost stopped drinking milk entirely. SOOO, last week I bit the bullet and used some of my Christmas money to buy a milk box, and start up home delivery. So now, every Thursday, the milkman comes to my door and puts all sorts of yummy things in my shiny new milk box! Better yet, they charge a deposit, and use the old-fashioned glass bottles. So, for the first time in many, many years, the milkman is making regular visits to our little house!

Yummy goodness (they even deliver, cookies, coffee, and sausages):

milk


Adorable milkbox:

milkbox

Wednesday, January 04, 2006

Jumpin' Jack Floor!

Hi everyone, sorry for the extended blogation, but blah blah holidays blah blah, you know how it is. Anyway, we did have a VERY busy New Year's weekend, the origins of which began the night of December 22nd, when Aaron was struck with the explanation of why our countertop was pulling away from the back wall of the kitchen at a concerning rate... of course, it was because the opposite side of the kitchen floor was sinking. Here goes my best attempt at explaining what happened.

At some point, our POs decided to widen the basement staircase, and may have ripped out a first floor powder room and pantry in the process. They also added some features that I love, like awesome tall pantry cabinets that can accomodate a full sized trash can, among other things. Anyway, when they decided to do this, they had to cut some of the floor joists next to the staircase, and they added a long board crosswise across the floor joists, which they hung from the floor joists using huge joist hangers at either end, and then toenailed it with like a billion nails into the floor joists. Unfortunately, without additional support, this was not enough to support the weight of our new giant fridge and all those cabinets, etc. etc. and thus the countertop pulling away from the wall. Sooooo, Aaron hatched a mighty plan to jack the floor back up and support it with two 2x6 boards nailed together and held by two posts made of 4 2x4s (which you will see below). This project had many phases, some of which are depicted below.

Phase 1, Friday December 30th- Mission: Turn basement floor into Swiss cheese:
Aaron rented an electric jackhammer from our local tool rental place, and tore up our thin concrete basement floor (it's about 2" thick, not enough to support what we wanted to support) so that we could dig two holes about 11" deep in which to sink our support posts. While we had the jackhammer, we also decided to get out the old drain pipe for the boiler, which someone cut off at knee level in order to make an extremely painful point about watching your step in the basement. Since we plan to tile the floor down there, Aaron also chipped out the concrete around the floor drain so that we could raise it up. In doing this, we determined that the sewer pipe connected to the floor drain had collapsed at some point, so we had a very old pipe broken right at a connection, making it very difficult to repair. A picture of this is below:

Break


At this point, we weren't sure what to do. We didn't feel comfortable digging the pipe out and replacing it, that was a really big job. The pipe wasn't in immediate danger, because it went to the floor drain, all the water was designed to run down into the connecting pipe, so water wasn't going to come out of the pipe, but we still needed to figure out how to seal it. So, we did what all desperate people do when they are truly stumped... we called Dad! And he had a brilliant idea- a plug. Here is the pipe with the cute little red plug-


Plugged


Here is Aaron with the pipe we've been running into for the past year and a half. It makes me so happy to fix something that has pissed me off since before we bought the house.


YAY!


Here is our little capped pipe. It was quite a job sawing this guy off with the hacksaw, so Aaron gets mad props for his perseverance.


Capped


Here is Aaron, indicating that he is truly a JACK of all trades! Hahaha! I'm so punny! (Turn me off, please...)

Jack of all trades

Actually, when Aaron told his dad what we were doing, he asked if we had any "adult supervision." Ha!

Saturday, December 31st- Mission: Jack up the floor, hammer in the support, and pour the concrete in time to go to the New Years Party!

After all of the drama with the pipe, we could finally start the big project. Here we are jacking up the floor in preparation for the final support (note the swiss cheese floor in the background)-


Jack


And after much cursing, headscratching, leveling, moving, releveling, removing, digging, etc. Here is Aaron fastening in the final support:


Finishing up giant beam


Finishing up giant beam 3


(I do stuff, really! I just also take all the pictures!)

To prove my point about the eleventy-million nails in the floor joists that the previous owner did, check out the disclaimer that I left to any FOs (Future owners) who decided that they wanted to rip out the walls in the staircase:


Disclaimer for FO


So, we were pleased to have finished a project (no pics of the concrete pour, b/c let's face it: Concrete is boring!

How does one celebrate a New Year in an Old House?
DESTRUCTION!

We think that we've almost finished the demo in the basement now- demo is fun!

Bathroom sans drywall

demolished bathroom


We finished up the weekend with a trip to the dump, and a little framing. Aaron is downstairs now rerouting some water pipes and upgrading the connections for the washer. I'll take some pictures when he's done and have him write a little post about what he's done. All I know is that the water is off! Hopefully, I'll have pictures to show finished framing this weekend!