Mission Accomplished!
Days of hard, dirty, dusty work... 4
Trips to haul concrete in my poor SUV... 5
Number of 80lb bags concrete poured...37 (that's 2960 lbs!, Thanks Mixmaster Mike!)
One level concrete basement floor... PRICELESS!!!
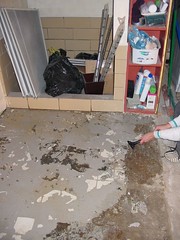
We're thrilled to be done. We're not thrilled that since we have decided to install one of these...

(possibly with chrome feet, not sure of that yet)
which has tremendously more aesthetic appeal that the scary shower you see in this picture...
We will be able to enlarge the bathroom to a space that is 4'10" wide and 10' long. The tub will go against one wall, turned longways to maximize the space in the long, narrow room. The tub is 31" wide, which will leave a clearance of 27". We're not sure if that is quite enough, it may end up being a little tight walking by the bathtub. Any comments?
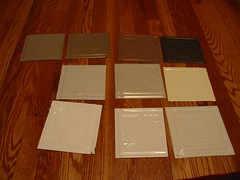
In other news, we purchased a termite warranty when we bought the house, since we had wood boring beetles in a floor joist when we moved in, which were treated. This warranty requires yearly inspections. Since we had the ceiling out in the basement, we went ahead and scheduled the inspection. They were able to get a really good look at all of the joists, and found some more in an area that they had not previously treated. Apparently these little guys are pretty hard to get rid of! They haven't done any structural damage, fortunately, (they're not nearly as destructive as termites) but it's important to take care of them as soon as possible, because it will require several treatments to completely irradicate them. We expect to have treatments every 3-4 months for the next year or so. This means that we need access to the ceiling for at least the next year, and would like to be able to get back in there to do the inspections beyond that. SOOO, we've decided to use the American Tin Ceilings panels that we had been considering, but instead of going with the nailup option that we had originally chosen, we're going to put in a dreaded (by many of you out there!) drop ceiling grid, and use their drop-in tin panels. We will paint the grid to match the tiles, and hopefully (if the pics in their brochure and on their website are any indication) it will look nice, and be easily removed. I ordered a color sample kit from them of the "whites". (We have the unfinished tin in our kitchen, and love it, but due to the low ceiling in the basement, we think that white is the best choice.)
Here is a picture of the color sample kit. We've chosen the second one from the left in the bottom row: "bright white satin".
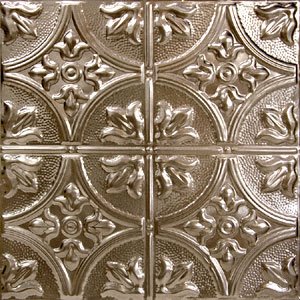
Now we're trying to decide on a pattern. We're using recessed lighting, and some of the pictures show a cutout in the circle motif for the lights, which I thought looked nice. That narrowed our choices down to the following two-
choice 1
or
choice 2
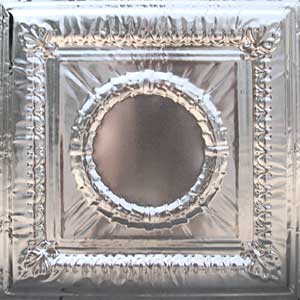
If you have any opinion, please vote in the comments section below. Remember, they will both be matte white on our ceiling, and the ceiling is low, in a long, relatively narrow room.
Thanks for your vote!
posted by amanda @ 10:10 PM
![]()


<< Home